Saturday, 31 August 2013

The Good, the Bad and the Bugly- All about pests!

Today at Kids Grow! we learned all about garden pests and helpers. We started out the day at Hillhurst Sunnyside, weeding our garden and taking a look at some of its residents, including a daddy long legs, some ants, and lots of bumble bees! After working on the garden, we headed over to the orchard to get started on some crafts and activities. First, we talked about garden pests and helpers, sorting insects and animals into 'Garden Helpers' and 'Garden Pests'. It's important to talk about how we treat all organisms in the garden; both helpful ones and hurtful ones. Spraying gardens with harsh chemicals and pesticides can have unintended effects, so we talked about other methods of dealing with pests. A great way to keep pesky birds from eating gardens is to set up a pinwheel to scare them away, so for today's craft, we made our own home made pinwheels!

Decorating our pinwheels!
Everyone started decorating their pinwheels with colourful drawings before assembling them. The results were beautiful, and everyone had a great time making them!


After finishing our pinwheels, we played a game of 'Farmers and Pests' in the orchard. Stealing all the farmer's food worked up an appetite for the animals, so we took a break for a healthy and delicious snack of grape tomatoes and cucumber slices. After another game of 'Farmers and Pests', it was time to say goodbye in Sunnyside Hillhurst until next Saturday's wrap-up. What a great morning!

In Silver Springs, the garden is looking amazing! There were lots of beans, carrots, beets, squash, pumpkins, and zucchini all ready to be harvested! After going through the day's crafts and activities, we went on a search in the garden for 'helpers' and 'pests', and we found some bumble bees, which help with pollination, and wasps, which (despite their bad reputation) help to clean up decomposing materials. After checking out some more great facts about bugs, we got to harvest a pumpkin, lots of carrots, and some beets! With so much produce left at the garden, we hope to see lots of people at next week's wrap-up so everyone can take something yummy home!

We'll see you next week!

Wednesday, 28 August 2013

Finger Licking Good


Homemade Edible Finger Paint Recipes
Some non toxic alternatives for some great creative pursuits:
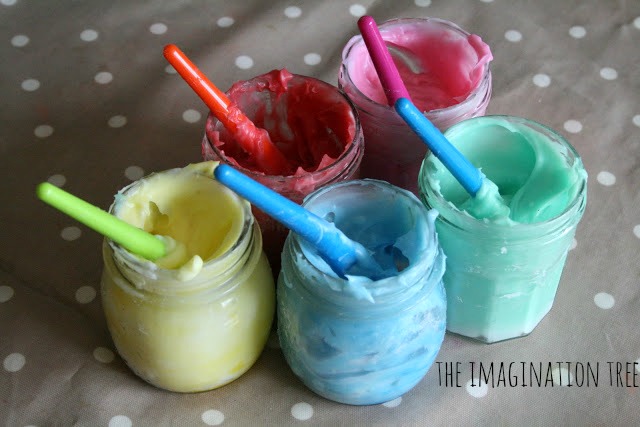
 homemade edible finger paint
Recipes from The Imagination Tree

 Ingredients
2 cups of corn flour/ starch
1 cup of cold water
4.5 cups of boiling water
 Liquid food colouring

Method:
Mix the cornflour with the cold water and stir together. Pour in the boiling water and stir between each cup. It goes really strange (you are basically mixing a hot oobleck goop) but keep stirring and it literally seems to “melt” into a wonderful, custard-like consistency. We then separated it into individual jam jars before adding colouring, but you can do it however you like and this is the stage to add colour.

Edited to add:
Some people have found that the paint remains liquid and doesn’t thicken up as it should. I have no idea why this should be, but I have two possible solutions:
 
1. Try simply adding up to 1 more cup of cornflour/ cornstarch and see if that helps to thicken it.
2. Try mixing the paint in a pan on a medium heat instead of just in a bowl, as that will help to bring it together.


Jello Finger Paint
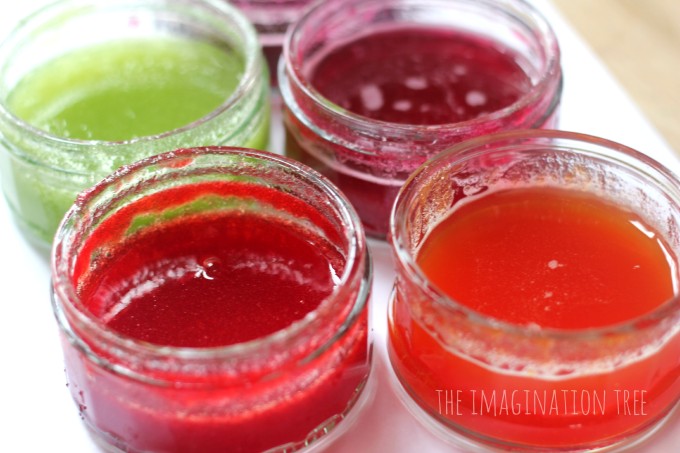
Edible jello fingerpaints


From the Imagination Tree

Directions:
Tip one sachet of each flavor fruit jello powder into a little dish.
Stir in some hot (not boiling) water and mix with a spoon until it becomes thin enough to be like finger-paint consistency. Experiment with the quantity of water to add in order for it not to set. I’d say we filed these little dishes about half full of water (around just less than half a cup.) Start with one and then when you’re happy with the consistency, move onto the others.

Stir all of the paints again to keep them from setting, then set them out with a range of brushes and some large pieces of paper (which can be taped down to the table to keep them in place.)
Then explore with fingers and taste buds!

[Note: obviously babies shouldn't be encouraged to eat large quantities of this paint, but a few tastes are not harmful at all.]


Summer Brunch Recipe


Take advantage of the remaining lazy days of summer for this spectacular French toast.

Blueberry-Cream cheese Stuffed Cinnamon French Toast


Erika’s adaptations on Fine Cooking’s stuffed French toast, and the Smitten Kitchen's Cinnamon  Toast French Toast.
This is a recipe open to endless variations. The following uses the delightful combination of blueberries and cream cheese; however one could also experiment with flavor combinations such as dark chocolate and sour cherry, or lemon curd and cream cheese…

Blueberry Cream Cheese Filling:

Ingredients:
8 oz. plain cream cheese
½ cup -1 cup blueberries (frozen or fresh)

Directions:
Adjust quantities based on preference. If you end up with extra, don’t worry, simply use it as blueberry cream cheese.
Gently warm cream cheese if it is too stiff to mix. If using frozen berries, heat (we are looking for a consistency in which the berries start to split and release some juice.) If using fresh blueberries, heat gently and crush slightly so the same consistency described above is attained. Mix the cream cheese and blueberries until the desired smoothness. Set aside.

Cinnamon French toast:
Ingredients:
1/2 cup (100 grams) granulated sugar
1 tablespoon ground cinnamon
16 slices (from a 1-pound or 450 gram loaf) white sandwich bread
1 stick (4 ounces or 113 grams) unsalted butter, softened
3 cups (710 ml) whole milk
6 large eggs
1/4 teaspoon table salt
2 teaspoons (10 ml) vanilla extract


Directions:

Preheat the oven to 450 degrees. Whisk the cinnamon and sugar together in a small dish. Line two large baking sheets with foil (this is optional – I tend to skip so as not to use foil). Place the bread slices on the baking sheets in one layer. Spread each slice of bread with 1 teaspoon of butter, and then sprinkle each slice with one teaspoon of the cinnamon-sugar mixture. This does not need to be precise!
 Toast the trays of bread in the oven until the bread is golden, and until the cinnamon-sugar makes a caramelized crunch on top, for about 7 to10 minutes. Reduce the oven temperature to 375 degrees and let the toast cool slightly.

Generously butter a 9×13-inch baking dish.

Cut two slices of the cinnamon toast in half horizontally. Arrange the cinnamon toast down in two rows along the width of the pan. Place a dollop of the blueberry cream cheese filling between slices. Begin with the bottom half of one slice of toast, then fan 7 more slices in a row, finishing with the top half of the slice. This ensures that those served the end pieces of the baked French toast are not stiffed with thin slices! Repeat with another 7 full slices and 1 halved slice of cinnamon toast in the second row.

Whisk the milk, eggs, salt and vanilla in a medium bowl and pour evenly over cinnamon toast in baking dish. Let sit for 15 minutes (or overnight, if you’re preparing this ahead of time) so that the custard absorbs a bit.
Before baking, if you’ve got any extra cinnamon-sugar (you’ll likely have a tablespoon or two), sprinkle it over the French toast.
Bake for about 40 minutes, until puffed and golden and until no liquid seeps out of the toasts when they are nudged about in the pan. Cut into squares and serve plain, or with a dollop of plain yogurt and fresh berries, or maple syrup.

Saturday, 24 August 2013

The Kids Grow team would like to extend a warm thank you to Sunnyside Natural Market for their generous support in providing a healthy, locally sourced snack for the children.

Garden Bounty … With Kids!


Honeydew-Tomato-Basil Popsicles

A creative flavor combination transformed into a fun 'scavenger hunt'; perfect for the last days of summer heat.
See if your little pirates can identify the ‘hidden treasure' ingredient in these Popsicles


Makes about 6


Ingredients:
2 cups cubed honeydew melon
1 large or 2 medium tomatoes, seeded and cut into chunks
10 large basil leaves
Juice from 1/2 lemon
Sweetener to taste (depending on sweetness of melon and tomatoes): honey or agave or simple syrup pinch of salt

Instructions:
  1. In a blender, puree together the melon, tomatoes, basil, and lemon juice. Taste the mixture—depending on how sweet (or not-sweet) it is, add anywhere from a splash to 1/4 cup of sweetener plus a pinch of salt and blend again. Adjust seasoning according to taste. When frozen, the flavors will dull slightly, so add a little more than you think is necessary.
  2. Pour into Popsicle molds and freeze according to the molds’ directions.
Recipe from http://debbiekoenig.com/2013/08/01/treat-your-vegetables/#sthash.PvcIVD3a.dpuf